
Create alerts to monitor performance and get notified when things change.
This page shows how to create and configure a basic Custom alert. For more alert examples, visit Sample alerts.
Before you begin
Before creating an alert, complete the following:
- Read Cloud Observability’s alerting concepts.
- Configure a notification destination.
Step 1: Name and describe your alert
Follow these steps to name and describe a new alert:
- In Cloud Observability, click Alerts > Create an alert.
- Click Enter an alert name to name your alert, for example, Supernova request rate alert.
-
Add a description by clicking Describe important details about this alert. The description supports Markdown, and you can include links to teams and runbooks. Here’s an example:
1
2
3
4
5
6
7
 Send alerts when request rates go above 13 per second over two minutes. Have questions?
 Ask in [#sre](https://lightstep.com/).

 Docs:

 - [Runbooks](https://lightstep.com/)
 - [Troubleshooting](https://lightstep.com/)
You can also add labels (such as team:android or service:myservice) to the description.
Step 2: Select an alert template
In the Alert template section, click Custom. Custom is Cloud Observability’s most flexible alert template. To see examples of other alert templates, visit Sample alerts.
You can switch templates when creating and configuring alerts. You may lose information if the inputs aren’t compatible, so Cloud Observability asks you to confirm the switch.
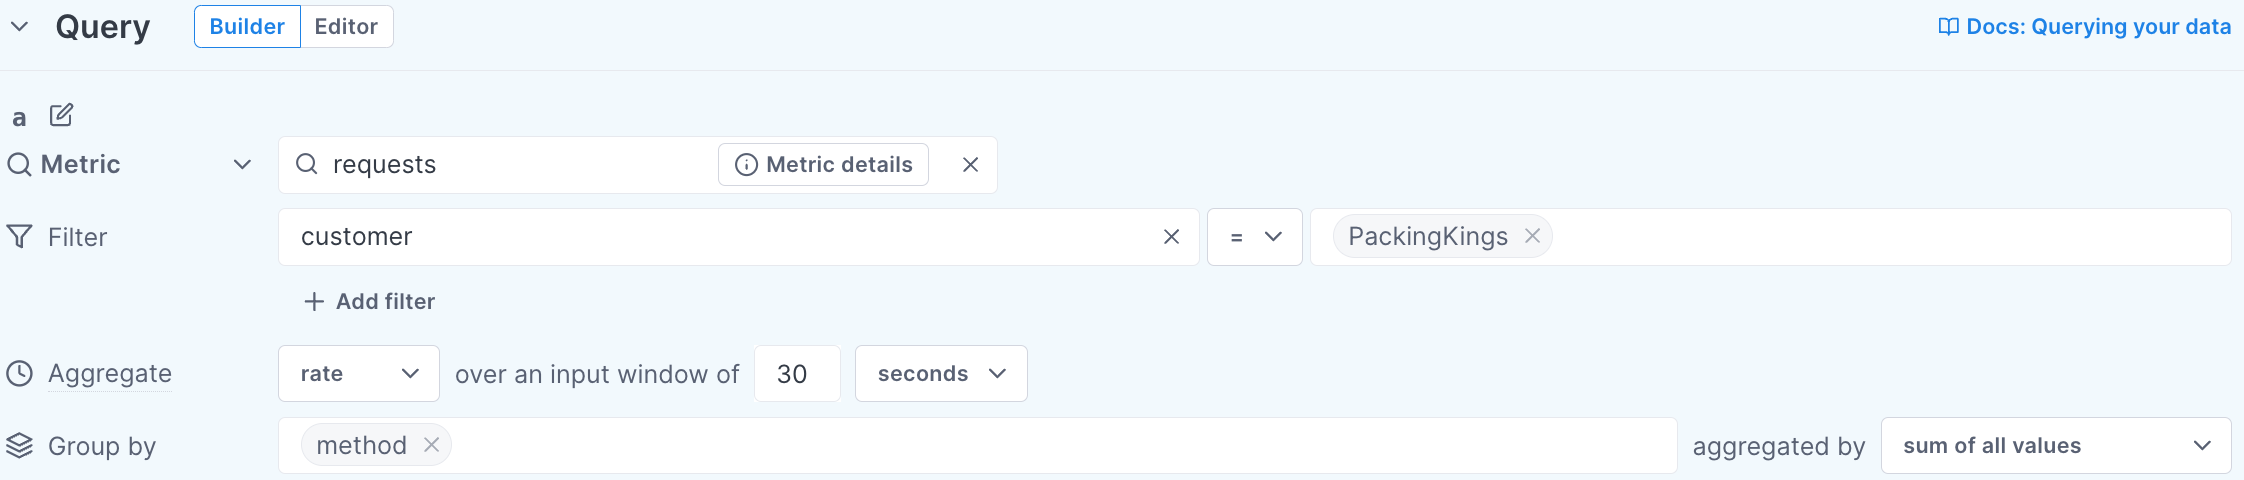
Step 3: Build your query
In the Query section, create your query using the Unified Query Builder. The example below queries request rates for the customer PackingKings, and it groups results by method name.
To manually write a query, click Editor. You can also use existing queries on dashboards or existing queries on notebooks to create alert queries.
Step 4: Configure your alert
Follow these steps to configure your alert:
- In the Alert configuration section, click the above drop-down and select one of the following:
- above - Send notifications when the metric goes above the threshold.
- below - Send notifications when the metric goes below the threshold.
- Set alert criteria:
- Toggle Critical, Warning, or both, and enter your thresholds.
Cloud Observability plots thresholds on the chart.
- [Optional] Toggle No data alert to get alerts if Cloud Observability doesn’t receive data for the query.
-
[Optional] Set durations:
You receive alerts only after the data meets the alert criteria for the set duration.
- For Critical, Warning, or No data alert, click 🕑.
- Enter a duration in minutes, hours, or days. The minimum and maximum durations are 1 minute and 2 days.
Step 5: Configure notification rules and save
Follow these steps to set your notification rules and activate your alert:
- Under Notification rules, click a single notification and select an option to configure notification behavior:
- a single notification - Get only one notification if one or more group values cross the threshold during the input window. For example, if two group values cross the threshold in a 30-minute input window, you get one notification.
- separate notifications - Get a notification every time a group value crosses the threshold during the input window. For example, if two group values cross the threshold in a 30-minute input window, you get two notifications.
- Click Search for a destination type to select the third-party tool you use for notifications.
-
Click Search for the destination name and enter the name of your notification destination.
If you haven’t created a notification destination, click Search for a destination name > + Create a destination.
- Make these optional changes to your notification rules setup:
- By default, Cloud Observability sends notifications when data crosses the configured threshold. If you want to receive notifications until the issue resolves, click Add notification frequency and configure the rate.
- To send notifications to another destination, click Add another rule and repeat the steps above.
- Review your changes and click Save to activate your alert. Cloud Observability displays Alert saved and returns you to the Alerts tab.
You’re all set! Visit the links below to learn more about Cloud Observability alerts.
See also
Manage notification destinations
Updated Nov 30, 2023